Step 3: Run Discovery and Pick Research Pages
What This Step Does
The platform takes the URLs you added when you created the campaign, scans them, and uses each page as research material. During discovery it may also find related pages on the same site (FAQ, ingredients, reviews, landing pages, etc.) and propose them as additional sources.
You get to:
- Review and refine the URL list before scanning starts.
- After scanning, pick which discovered pages to keep.
Both reviews matter. Bad inputs at this stage mean off topic or off brand content shows up in the generated briefs later.
Review the URL List Before Discovery
The screen shows the URLs already attached to the campaign plus a field to add more. There is also an optional Add reference files section if you have brand documents, PDFs, or research notes worth feeding into the synthesis.
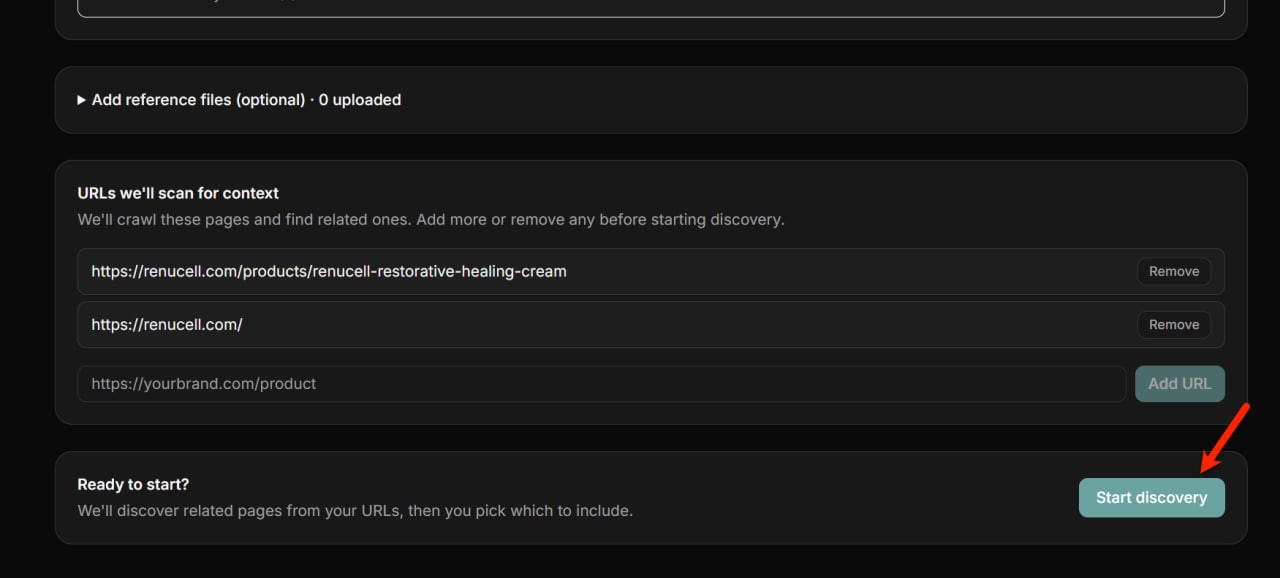
Before clicking Start discovery:
- Add anything missing. A product page, the brand home page, an FAQ, or a landing page if it is genuinely useful.
- Remove anything irrelevant. Pages for other products on the brand, archived pages, or anything that could introduce wording you do not want the AI to pick up.
- Add reference files if needed. Brand guidelines, product spec sheets, customer research, or anything else that adds important context.
You can change the list right up until the moment you click Start discovery. Once discovery runs, the discovered pages are based on this list.
Start Discovery
Click Start discovery. The platform begins crawling. It pulls each URL, extracts content, and looks for related pages on the same domain.
This takes a couple of minutes. The button label changes to a progress indicator while the crawl runs. The page is safe to leave; the workspace will keep the state.
Review Discovered Pages
When discovery finishes, the screen shows every page it found, marked with the source (seed URL versus crawled discovery) and a rough relevance score. Some are pre selected for you. The rest are unchecked.
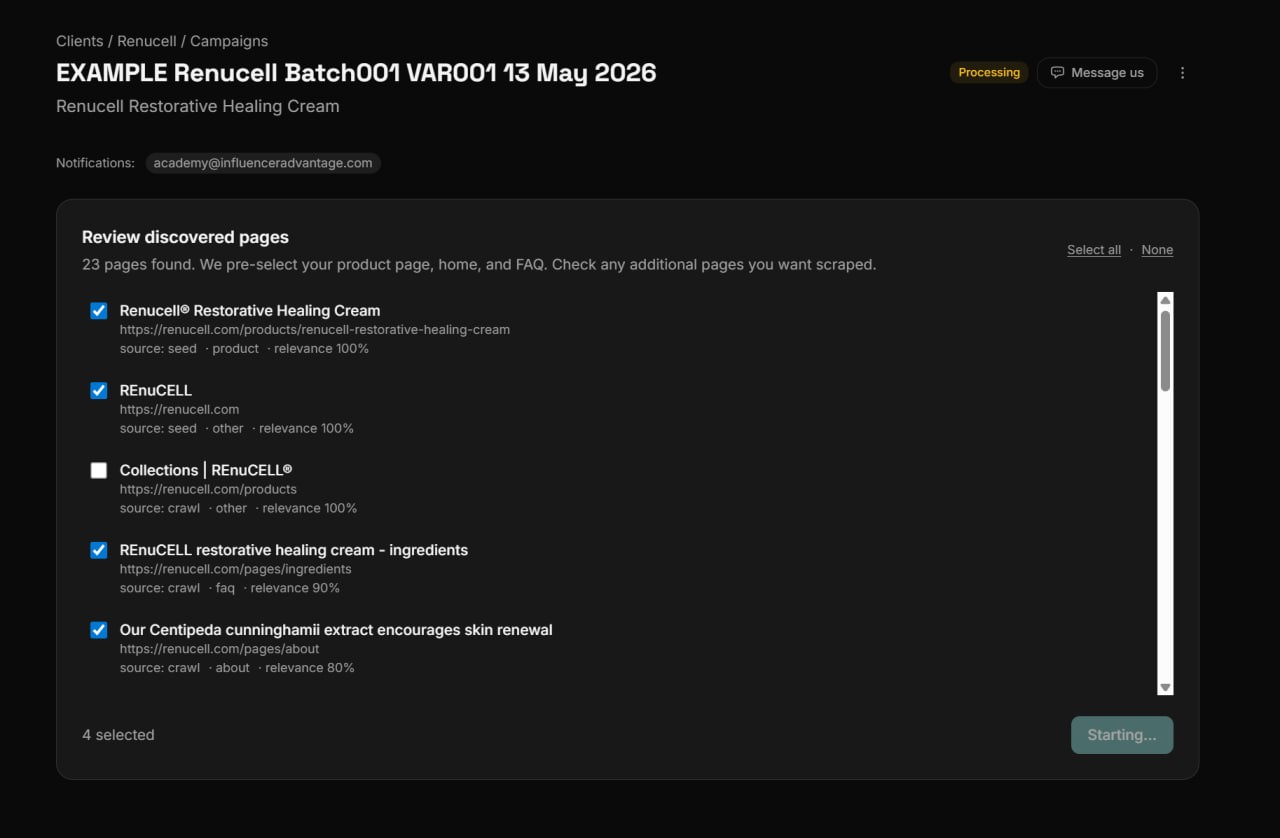
Walk through every row and decide if it belongs in research.
Keep a page when it adds:
- Product facts (ingredients, materials, sizing, certifications).
- Benefits and proof points.
- Audience insight (who the brand is for, what they care about).
- FAQ answers that map to real customer questions.
Skip a page when it is:
- Unrelated to the specific product this campaign is for.
- A duplicate that says the same thing as another selected page.
- Outdated, archived, or off brand.
- Likely to introduce claims you do not want the platform using.
More pages is not always better. A focused set of 4 to 6 strong pages typically beats a sprawling set of 15 where half are noise. The platform synthesizes everything you select, so signal beats volume.
When the selection looks right, continue to the next step. Generation runs against the pages you kept.
What Happens After You Continue
The platform begins synthesizing the research into one or more creative briefs. Behind the scenes it is:
- Scraping the selected pages.
- Processing any reference files you attached.
- Combining everything with the brief you uploaded.
- Producing brief variations the team can produce.
That part is the next step.
- Inside the Campaign Research explains the research step in depth: what it reads, what it produces, what it cannot do.
- Uploading Product Images and Research URLs covers where research URLs live across the broader product flow.
Previous: Prepare the brief · Next: Approve creative variations
Related articles
Still need help?
Our team is ready to assist you. Get in touch and we will respond within 24 hours.
Contact Us